PACOTIZING® – CUTTING – WHIPPING
QUICK ACCESS
|
|
BEFORE PACOTIZING® | |
|
|
PACOTIZING® | |
|
|
CUTTING | |
|
|
WHIPPING |
BEFORE PACOTIZING®

Fill the pacotizing® beaker with the food preparation.

Note: Ensure when filling the pacotizing® beaker that a smooth surface can be created, the pacotizing® beaker is filled no higher than the fill line, and there are no cavities (if necessary, fill these with liquid – water, broth, etc.). Mixtures must not be frozen too hard.

Note: An overfilled pacotizing® beaker will be detected, and the volume will be reduced down to the maximum permissible. After this automated process is complete, remove the pacotized® mass from the pacotizing® beaker and start the process again.
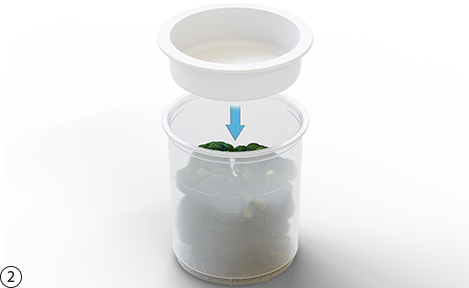
Close the pacotizing® beaker with the included beaker lid.

Allow the contents to reach a deep freeze in the freezer for at least 24 hours at a temperature of –20°C / -4°F.
Caution: Insufficiently frozen food preparations (no colder than –20°C / -4°F) can result in damage to the device and accessories! Ensure that the pacotizing® beaker is set level in the freezer so that the surface freezes flat in the pacotizing® beaker. Do not go back and add already frozen food preparations to the pacotizing® beaker.
Pro tip: Write the date and time so that anyone can know when the product was frozen and thus the soonest it can be pacotized®.
PACOTIZING®

Insert the preliminary scraper into the spray guard.
Pro tip: The preliminary scraper and spray guard are newly labeled with PACOJET. During assembly, both logos should be facing up.
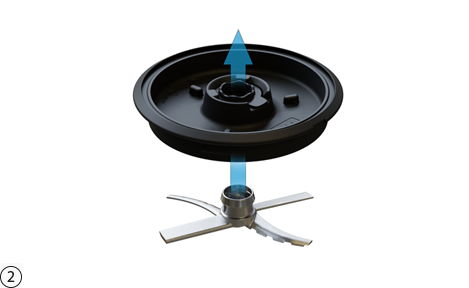
Insert the pacotizing® blade into the spray guard.
Note: Ensure that the spray guard is clean, dry, and free of grease.
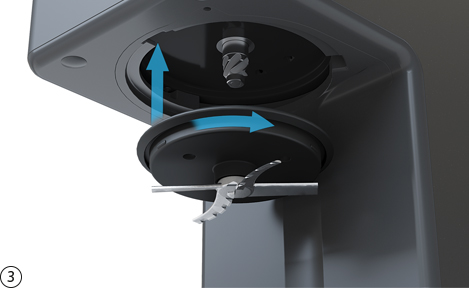
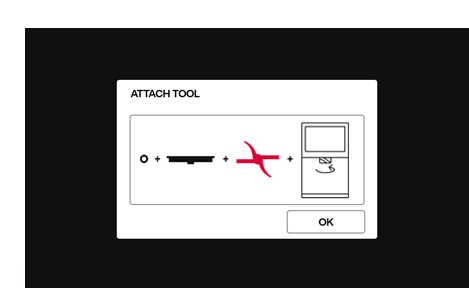
Attach the combination of the spray guard, preliminary scraper, and pacotizing® blade to the tool coupler on the pacotizing® shaft. The pacotizing® blade is properly attached when it holds tightly to the tool coupler.
Note: The tool pot and tool coupler must be free of residue and must be dry prior to tool attachment. Damage by improper attachment of the pacotizing® blade to the spray guard is possible!

Remove the pacotizing® beaker with the food preparation from the freezer. Remove the beaker lid. Place the pacotizing® beaker inside the protective beaker.
Note: The supplied pacotizing® beaker is made of synthetic material. A pacotizing® beaker made of chrome steel as well as its appropriate protective beaker are available.

Note: Use the correct beaker combination (protective outer breaker and pacotizing® beaker).
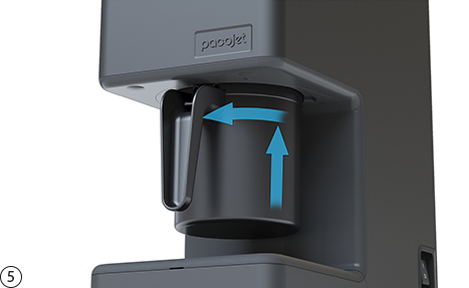
Attach the pacotizing® beaker and protective beaker. The protective beaker is properly mounted when it has locked in place.

Select “Pacotize®” in the main menu.

Select the number of portions (left number = whole portions, right number = tenths of portions) using the appropriate number in the number line displayed.
Selecting the  symbol pacotizes® the full contents of the pacotizing® beaker.

Select the number of automatic repeats using the number line.
Note: The number of repeats applies to the area that is pacotized®.
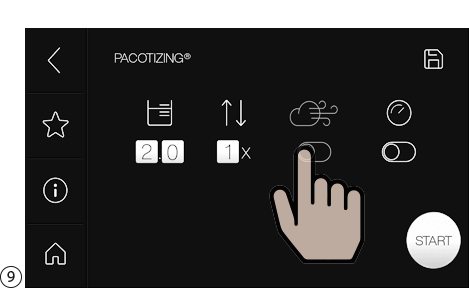
If you wish to pacotize® without overpressure, turn overpressure off.
Note: Pacotizing® with overpressure changes the consistency (volume expansion, flavor intensification) of the pacotized® mass.

Press the Jet® Mode button if you would like to use a faster processing time (processing time 90 seconds). This automatically changes the number of repeats to 2, which can be changed later.
Note: The recipes at www.pacojet.com that are specifically meant for Jet® Mode are identified by the symbol  .
.
The information symbol  on the touchscreen displays the steps required.
“Softer” recipes with a high fat and sugar content are generally suitable for rapid processing. Avoid its use for recipes with a high water content. Frequent use of the rapid processing feature (Jet® Mode) can result in increased wear of the pacotizing® blade. Never use liquid nitrogen!
Caution: Overload/overcurrent can occur if the mass is too hard!

Press “Start” to start the pacotizing® process.
Note: The processing operation can be followed on the touchscreen.
Note: If the spray guard is not properly attached or if a tool unsuitable for the pacotizing® process is used, an error message will appear.
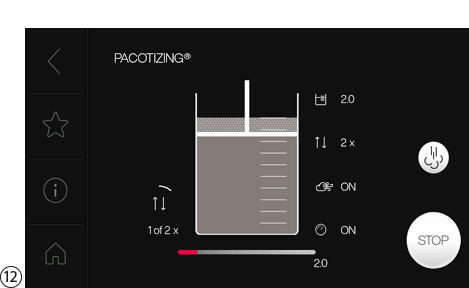
During the pacotizing® process, the selected parameters as well as the processing progress are displayed.
Note: The pacotizing® process can be stopped at any time by pressing the Stop button.

Once the pacotizing® process is complete, the display shows the portions remaining in the pacotizing® beaker.
Note: If the pacotizing® beaker contents are insufficient for the number of portions desired, this will be indicated. Load a new, sufficiently filled pacotizing® beaker.

Twist the protective beaker out after pacotizing®. Pressing the lever on the handle of the protective beaker makes it easier to remove.

Note: If the entire contents of the pacotizing® beaker will not be used, the contents must be smoothed out before re-freezing.
CUTTING
Insert the preliminary scraper into the spray guard.
Pro tip: The preliminary scraper and spray guard are newly labeled with PACOJET. During assembly, both logos should be facing up.

Attach the coupe set knife to the device together with the spray guard with the help of the cutter tongs. The coupe set knife is properly attached when it holds tightly to the tool coupler. Attach the pacotizing® beaker and protective beaker.
Note: The tool pot and tool coupler must be free of residue prior to tool attachment.

Caution: Risk of injury! Never touch the sharp edges of the coupe set knife. Only grab the coupe set knife by the tool pot or by using the cutter tongs.

Select “Cutting” in the main menu.
Note: Only fresh, non-frozen foods are suitable for cutting. Never try to cut bones or very hard foods (e.g., nutmeg)!

Set the number of repeats and whether to cut with normal pressure or overpressure.
Note: The information symbol on the touchscreen displays the steps required.
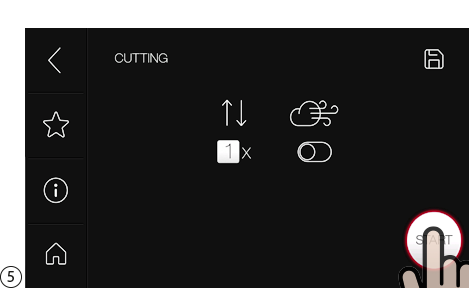
Press “Start” to start the cutting process.
Note: The processing operation can be followed on the touchscreen.

Note: If the spray guard is not properly attached or if a tool unsuitable for the cutting process is used, an error message will appear.

Remove the coupe set knife with the help of the cutter tongs.
WHIPPING
Insert the preliminary scraper into the spray guard.
Pro tip: The preliminary scraper and spray guard are newly labeled with PACOJET. During assembly, both logos should be facing up.

Insert the coupe set whipping disk into the spray guard.

Attach the coupe set whipping disk together with the spray guard to the device. The coupe set whipping disk is properly attached when it holds tightly to the tool coupler. Attach the pacotizing® beaker and protective beaker.
Note: The tool pot and tool coupler must be free of residue prior to tool attachment.

Select “Whipping” in the main menu.
Note: Liquids and soft foods that can be mashed with a fork (e.g., bananas, egg whites, cream) are suitable for whipping.
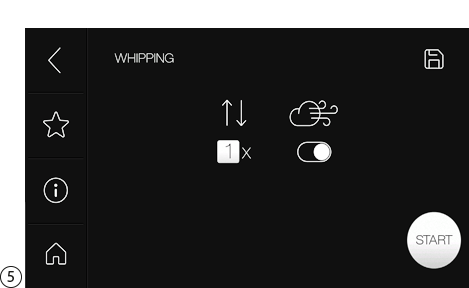
Set the number of repeats and whether to whip with normal pressure or overpressure.
Note: The information symbol on the touchscreen displays the steps required.
Risk of foaming! Set the number of repeats low, as some foods can expand substantially. Observe the maximum fill quantity of 400 ml.
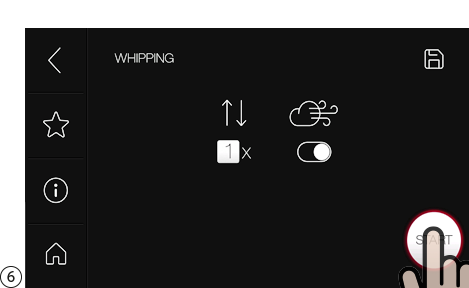
Press “Start” to start the whipping process.
Note: The processing operation can be followed on the touchscreen.

Note: If the spray guard is not properly attached or if a tool unsuitable for the whipping process is used, an error message will appear.

Carefully remove the coupe set whipping disk.